For the rest of this series, see Preface and Part 2.
In this tutorial, I’ll walk through the basic setup for the tools to make your first Quake map. First, we’ll set up Quake to run with a modern sourceport. Then we’ll set up our level editor, Trenchbroom. Last, we’ll get our compiler running.
If you want to skip this tutorial and jump straight into the tools, you can download Jonathan Linat’s setup https://github.com/jonathanlinat/quake-leveldesign-starterkit. All you need to do is add an “id1” folder with your “pak0.pak” and “pak1.pak” files, which I explain below. Also note that Jonathan’s setup includes some tools we won’t be using in this tutorial, and there are some small differences in the file structure.
If you prefer a video explanation for setting up your tools, here is Dumptruck_DS’s quickstart tutorial covering the basics: https://youtu.be/gONePWocbqA
The Folder Structure
To start, we need to create some folders. Go to a root directory of your computer, this could be your “C:” drive, or an “E:” or “F:” drive if you use external storage. In this root directory, create a folder named “QuakeDev”. This is where we will keep all of our tools and content.
Inside of “C:\QuakeDev”, create the following folders:
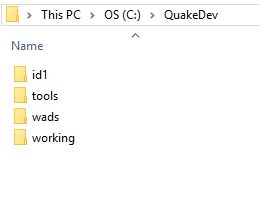
- “id1″—where we store the original Quake content and our completed maps.
- “tools”—where we store our editor and compiler
- “working”—where we store our rough drafts “.map” files.
- “wads”—where we store our texture packages, called “.wad” files.
Your folder structure should now look like this:
Quake Game Assets
Now that we have our folder structure, we need to fill it. And the first thing we need is the Quake content so we can play the game.
If you don’t have a copy of Quake already, you can purchase it for a few dollars on steam or gog (where it also includes the expansion packs).
Once you have downloaded a copy of the game, you will need to find the files “pak0.pak” and “pak1.pak” within the “id1” folder. These “pak” files contain all of the game’s content, including the models, textures, sounds, maps, and even the compiled gameplay code! Copy these files, and paste them in your “C:\QuakeDev\id1” folder.
How to find your id1 pak files from a steam download
While in your “C:\QuakeDev\id1” folder, you should also add a “maps” folder. This is where our final levels will go so we can play them.
The Sourceport
If you have played your copy of Quake through steam or gog, you may have run into problems with the graphics on your modern computer. This is where sourceports come in. A sourceport is a modern version of the engine (a port of the source code) to run the gameplay code with more features and better compatibility.
For a simple sourceport, I recommend Quakespasm, which you can download here: https://sourceforge.net/projects/quakespasm/. For additional information about Quakespasm, you can visit their website.
I will be using Quakespasm throughout this tutorial, but you may also be interested in trying the Mark V sourceport http://quakeone.com/markv/.
Once you have downloaded your sourceport, you should extract the files into your “C:\QuakeDev” directory.
With the sourceport extracted, your “C:\QuakeDev” directory should now look like this:
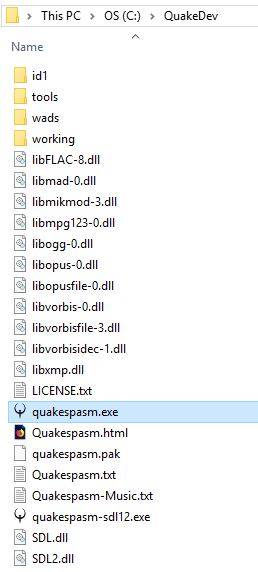
It’s important that your sourceport executable (“Quakespasm.exe” in this case) is in this folder above the id1 folder, because quakespasm needs the id1 “.pak” files to run.
If you extracted your sourceport into a subfolder, like “C:\QuakeDev\Quakespasm-0.93.1_Win64”, then the sourceport won’t work without additional configuration. You should cut and paste those files to the “C:\QuakeDev” directory.
Testing So Far
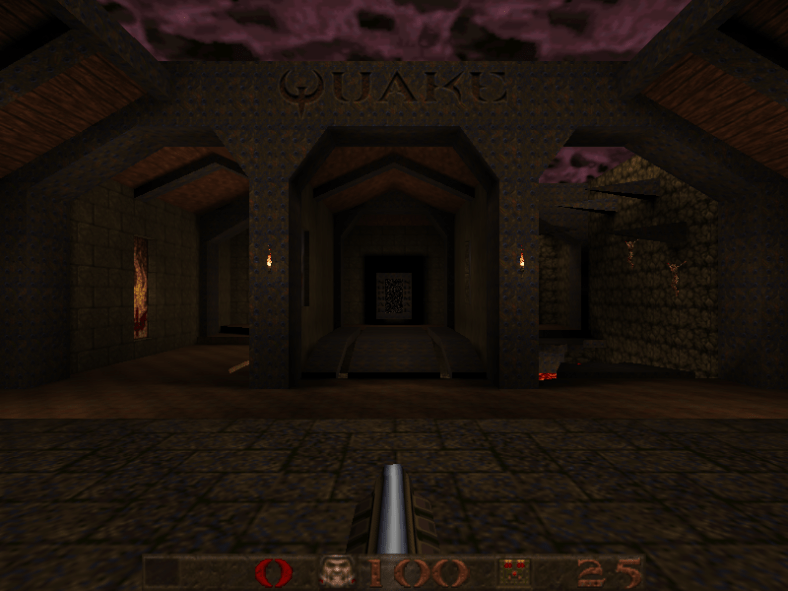
Now that you have the game and your sourceport, you should test that everything works. Run “Quakespasm.exe” and attempt to start a new singleplayer game. If everything is correct, you should see something like this:
If instead you see a warning like this…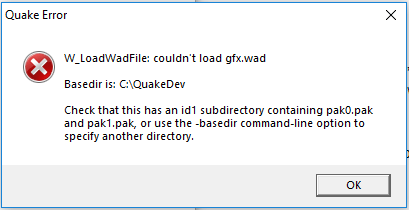
… double check that “Quakespasm.exe” and the id1 folder are in the QuakeDev folder, and that “pak0.pak” and “pak1.pak” are directly within the id1 folder.
At this point, you can now play all of the base game for Quake. As you go through this tutorial series, I recommend taking the time to play the first episode of Quake. This will help you develop your tastes as a designer and gain a sense of what works and what doesn’t, especially from a perspective of 2019 looking back at a 23 year old game.
The Level Editor
Now that we can play Quake, let’s set up the tools to make maps. First, we need a level editor, which let’s us create and modify our “.map” files; this means everything from shaping level geometry to adding monsters and applying textures.
For our level editor, we will be using Trenchbroom, which you can download here: https://github.com/kduske/TrenchBroom/releases/download/v2019.6/TrenchBroom-Win32-v2019.6-Release.7z. You can also read more about the tools on the main Trenchbroom website.
Once you have downloaded trenchbroom, extract it into your “C:\QuakeDev\Tools” directory. You may also need 7-zip to extract the Trenchbroom files. (7-zip is a tool that allows for better zipped file compression than standard “.zip” files.)
For Trenchbroom and our other tools, the exact directory location does not matter. We could have our Trenchbroom folder in “My Documents” and still be able to work. But it’s good to keep organized with all of your tools in one spot, especially if you have multiple versions of the tools.
Once you have your Trenchbroom files extracted, I recommend creating a shortcut to the “Trenchbroom.exe” in your main “C:\QuakeDev” directory. This will save you time digging through folders, and make life easier for enabling mods later on.
The Trenchbroom file structure and shortcut
Configuring Trenchbroom
Now let’s run Trenchbroom for the first time and make sure it works. First, let’s set our preferences for making Quake maps in Trenchbroom. When you create a new map, there is an option to Open Preferences. Here, you should go to the Quake tab and set the Game Path to “C:\QuakeDev” where your sourceport is.
These preferences are also where you can modify your keyboard, mouse, and display settings for Trenchbroom. For this tutorial series, we will be using the defaults.
Now that the preferences are set, let’s create a new map and select Quake for the game. If everything is working, you should see a screen like this:
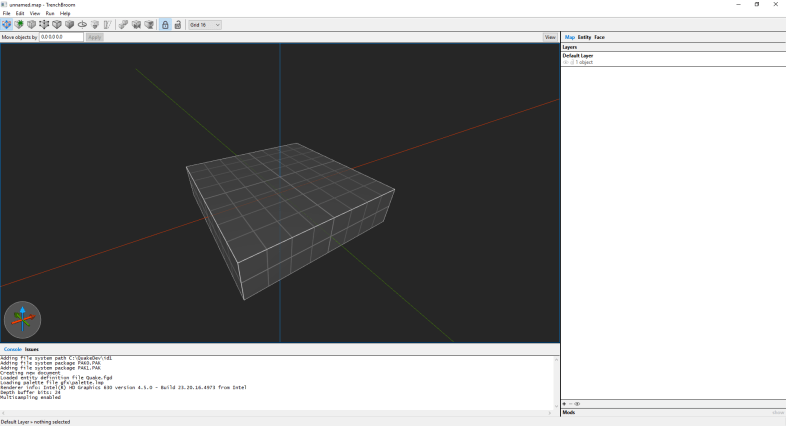
I will go into detail on the features of the Trenchbroom editor in a future tutorial. For now, what matters is that it works!
If you saw an error message, or your editor did not launch successfully, you may need these Visual C++ Redistributables.
The Compiler
Quake level design involves two main types of file. There are the “.map” files, which are what we use in our level editor. Then there are the “.bsp” files, which are the compiled maps that we can play. In order to turn the raw “.map” file into a “.bsp”, we have to compile it. This compilation process optimizes the map, creating “view portals” that determine what is visible to the player in the final map. The compilation process also calculates the lighting in our level by “baking” the light data as “lightmaps”, sort of like texture.
You can think of compiling like baking a cake. The “.map” file is the cake batter and the “.bsp” is the cake. While we’re working with the batter, we can still make changes. Once the batter goes into the oven and “compiles”, those changes are locked in. Our compiler tools make our lives a little easier than with baking because we get to keep a copy of the “.map” when it creates the “.bsp” result, instead of having to start a new cake.
For our compiler, we will use EricW’s Tools, which you can download here: https://github.com/ericwa/ericw-tools/releases/download/v0.18.2-rc1/ericw-tools-v0.18.1-32-g6660c5f-win32.zip. You can also read more about EricW’s tools on his website. As a modern compiler, we get many more options than were possible with Quake back in 1996, like sunlight and bounce lighting!
Once you download EricW’s compiler, extract it to “C:\QuakeDev\Tools”. Your folder should now look like this:
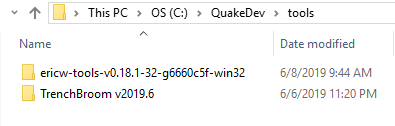
Inside of the ericw-tools folder, you should then have a “bin” folder and a “doc” folder. The “bin” folder contains the “binaries” which are the executables that run the various stages of “.map” compilation.
You now have everything you need to make and compile a map! But, let’s make our lives a little easier with a graphical user interface for our compiler. For this, we will be using the Necros Compiler GUI, which you can download here: http://www.quaddicted.com/files/tools/ne_q1spCompilingGui103.zip. You can also read more about the compiling GUI on the tool’s website, The Shores of Nis.
Once you download the compiler GUI, extract it to “C:\QuakeDev\Tools”. Your folder should now look like this:

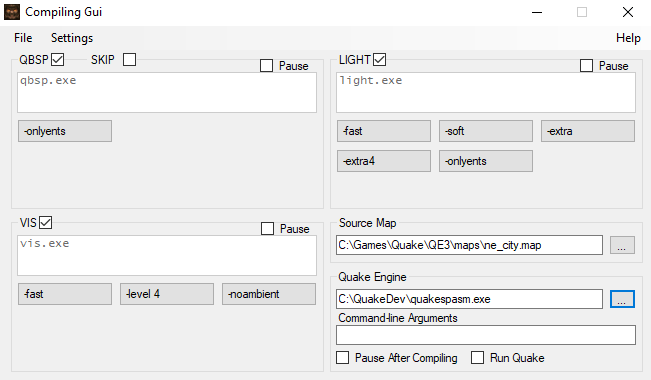
Now we need to set up our compiler GUI to know about the actual compiler tools. Go to “C:\QuakeDev\Tools\ne_q1spCompilingGui103” and run “ne_q1spCompilingGui103.exe”. From here, let’s go to “settings” and then “folder setup”. On this screen, we need to make three changes:
- Set the “Tools Folder” (in the top left) to the “bin” folder containing the EricW compiler tools.
- Set the “Working Folder” (in the middle right) to the “C:\QuakeDev\Working” folder we created earlier. This is where the compiler will save a copy of our “.map” and output warning logs for errors.
- Set the “Output Folder” to “C:\QuakeDev\id1\maps”. If you did not create this “maps” folder earlier, do so now. This is where our compiled “.bsp” will go so we can play them.
Once you have completed these steps, your compiler settings should look like this:

Now select “Done”, which returns you to the main screen of the compiler GUI. Here, we need to set the “Quake Engine” to our sourceport. Once we have a map to compile, we will also want to change the “Source Map”.
As with Trenchbroom, I recommend creating a shortcut to the “C:\QuakeDev\Tools\ne_q1spCompilingGUI\ne_q1spCompilingGUI.exe” that you can access from the main “C:\QuakeDev” directory.
One Last Thing
All you are missing now to make your own first Quake map are some textures. To keep things simple to start, I recommend downloading id1_wads_per_map, which includes a “.wad” texture package for each level in the original game. I also recommend Khreathor’s prototype.wad, which has simple grid textures and a variety of colors.
Extract your “.wad” texture packages into the “C:\QuakeDev\Wads” directory to keep things organized.
Next Time
For Part 2 of this tutorial series, I explain how to use these tools that we’ve set up. I also explain how to take a basic map through the compilation process. In Part 3, we’ll start modifying our first map and learning some features of the tools. From there, we’ll explore the design patterns of Quake.
In the meanwhile, here are some resources for you to continue learning:
- Dumptruck_DS’s Trenchbroom Video Tutorials
- The Quake Mapping Discord for help and questions. (You can ping me @ mclogenog, or ask others for help)
- The Quake level repository Quaddicted
