The Good Sewer Level: Reference Dump

In preparation for Quake Sewer Map Jam, I’ve gathered a bunch of references from my favorite sewer levels in games. I also recorded a playthrough of the Dunwall Sewers from Dishonored. I intend to record similar videos for these levels below as I have time in the coming weeks.

If there are other good sewer levels you think I’m missing, let me know!

I am also interested in knowing more about the development process behind these maps. If you happen to know who worked on these levels—or if you worked on them yourself—let me know!

Mirror’s Edge (2008), “Chapter 2 – Jacknife”

Level design by Elisabetta Silli
Mirror’s Edge team credits

Titanfall 2, “Blood and Rust”

Level design by Davis Standley
Level scripting by David Shaver
Titanfall 2 team credits

Wolfenstein: The New Order, various chapters

Level designs by ???
Lighting art by Tomas Lidström
Wolfenstein: The New Order team credits

The Good Sewer Level: “Dunwall Sewers”

I’ve started a series of videos analyzing the level design and environment art of sewer levels in video games. In this first episode, I walk through the “Dunwall Sewers” level from Dishonored (2012).

Several concepts recur throughout the video:

  • The Dunwall sewers are home to rats. This is where the game introduces the consequences of the rat plague and shows the rats aren’t just woldbuilding and backdrop, but rather a real system that responds to the player. In the earlier parts of the tutorial, we heard about the rat plague, but here through the sewers we see what it means and what it is doing to the city.
  • The sewer is interlinked with the city above it. The two run in parallel, and the player must understand this truth about the sewers in order to see the city of Dunwall for all it is. For those who live on the surface, the sewer is out of sight and out of mind, a dumping ground without consequences. But as we move through the sewer, we see the rot beneath the city, how the dead become food for rats. This ties into film noir themes of the antihero delving into the shadows.
  • Lighting creates a dialogue between the forces intersecting with the sewer. We see the electric blue lighting of authority playing against the flickering warm light of lamps placed by civilians attempting to live in the sewers. We also see natural light in neutral white and subtle blue tones, which is there to remind us of the sewer’s relationship to the city above. The lighting is also another source of reference from film noir, using diagonal spotlights with sharp parallel lines cutting across it in bars, like The Third Man or Touch of Evil.

If this has you inspired to make your own sewer level, the Quake Sewer Map Jam starts tomorrow!

Announcement: Quake Sewer Map Jam!

Everyone hates sewer levels.

Too often they are cramped, repetitive, and disorienting. They limit the range of gameplay systems and require one right way to play. They are the antithesis of playgrounds and sandboxes. At their worst, a sewer level drags with no end in sight and stretches a game thin.

Yet, there is an appeal to sewer levels that is so hard to achieve:

  • A good sewer level is a moment to breathe. In its tunnels, there is quiet and refuge which invites introspection.
  • A good sewer level is raw design. This isn’t the place for the one-off scripted sequence or the expensive art setpiece. Instead, a good sewer level is subtle in its mastery of the craft: geometry, lighting, and textures working in unison.
  • A good sewer level is also environmental storytelling at the scale of systems. As we navigate the space, we glimpse something larger than us. We see the flows in, the flows out, and the processes they undergo. There is history and logic at play in the sewers.
  • And sewer levels, both good and bad, are a space for dreams. Unlike the tombs and dungeons of tabletop RPGs, sewers exist alongside our daily urban life but unseen, like the city’s subconscious. They are an id to the ego of the streets. They are also a home for nightmares.
20190721184901_1

Wolfenstein: The New Order, Chapter 7

How do we solve these conflicts of design? How do we take a sewer level—which everyone hates—and make it good? This is the goal of the Quake Sewer Map Jam. This design problem is the theme.

If you are up for this challenge, here’s what you need to know:

When does the event start? When is the deadline?

The jam begins July 28th and ends August 31st at 1 PM Eastern Standard Time.

My hope with the longer deadline is that more people can participate as they have time. I don’t expect anyone to use the whole month+ on a sewer map. Please pace yourself and reduce scope if you run short on time!

Also, if your map only took you a few hours, you are still welcome to submit it! There is no barrier for quality so long as your map is playable start to finish.

Are new mappers welcome?

Yes! Newcomers are encouraged to participate! Sewers have a lot in common with traditional tabletop dungeon design, so this should be a great opportunity to pick up the tools.

If you aren’t sure where to get started, most of the talk about Sewer Jam is taking place in the Quake Mapping Discord, so stop by and we’ll be happy to get you started. Or, if this is your first time mapping for Quake, here is a Quickstart Tutorial.

Are there any special modifications?

We will be using a new version of the underwater jam’s mod.  This allows for dynamic water! You can read more about these features Here. I will update these links once the new version is available.

If you want to stick to vanilla id1 features, that works too! The progs add features, which you can ignore, but they don’t alter any of the standard features.

Are there any special textures?

We’ve gathered some textures from id1, Daikatana, and a few community packages into the sewerjam_wad.zip. I hope these textures provide a starting point for some ideas, but you are welcome to use different textures.

What is the naming convention?

Please name your map “swjam_[username]”. For example, my map would be “swjam_yoder”. If you build the map collaboratively, please include both names.

Where do I send my map?

Once you have completed your map, you can send it to me at AndrewYoder@live.com or on the Quake Mapping Discord. If I don’t reply within a day, feel free to nudge me again.

Please also include a readme file, and consider including the “.map” file so other people can open your level in the editor and learn from your design.

How strict is the theme?

Your map should draw on the ideas of sewer levels, but there is flexibility. You can make a canal, a cistern, or water treatment plant. It may also help to think of a secondary theme. What does a blood sewer look like? Or a sewer in space? What kind of sewer would you find under a dark mage’s tower? All of these ideas are welcome!

Anything else I need to know?

Your level exit should go to the “start” map.


20190721152204_1

Dishonored, Dunwall Sewers

Despite a mess of design problems, sewer levels are rich with theme. They are also a place to practice the subtleties of our craft. Over the next few weeks, I will be writing about some of my favorite sewer levels, like the two pictured above, and why they work.  I may also write about the sewer levels that failed and why.

I know sewers make for a bizarre theme for an event, but I hope you all will join me in showing what a good level a sewer can be!

Making Your First Map in Quake (Part 2)

For the rest of this series, see Preface and Part 1.

Our Progress So Far

In Part 1 of this tutorial, I covered the tools needed to make and play a map for Quake. Specifically, I explained:

  • The sourceport, Quakespasm, which allows us to play Quake on modern computers.
  • The editor, Trenchbroom, which allows us to make and modify “.map” files.
  • The compiler, EricW Tools , which allow us to turn our “.map” files into playable “.bsp” files.
  • And the compiler graphical user interface, ne_q1sp_compilingGui, which makes it easy for us to use the compiler.

In Part 1, I also explained the folder structure and settings for these tools so that they work together. If you have all of the tools set up, let’s compile our first map!

Exploring a Map

To keep things simple, I have prepared a map for you to use, named “tutorial1.map”, which you can download Here. Once you have downloaded the map, move it to your “C:\QuakeDev\working” directory and open the map with Trenchbroom.

When you open the map, you should see something like the image below. If you don’t see any textures, or your editor has a different arrangement, I explain more below.
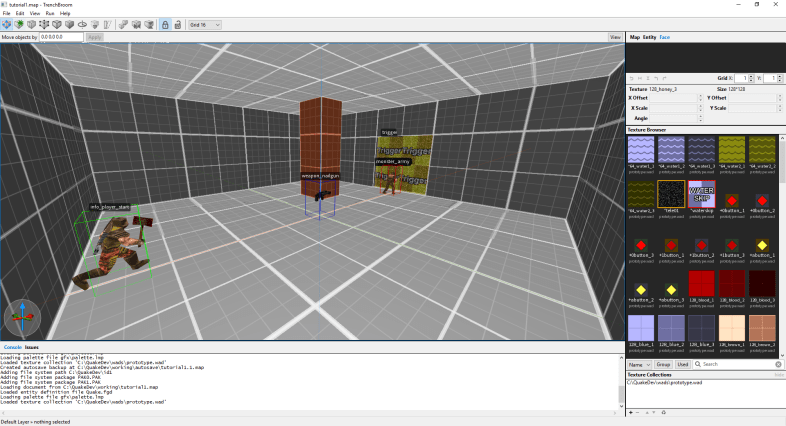
tutorial2_editor.PNG

The Editor Layout

There are four main components to the Trenchbroom level editor.

tutorial2_editorLabels.PNG

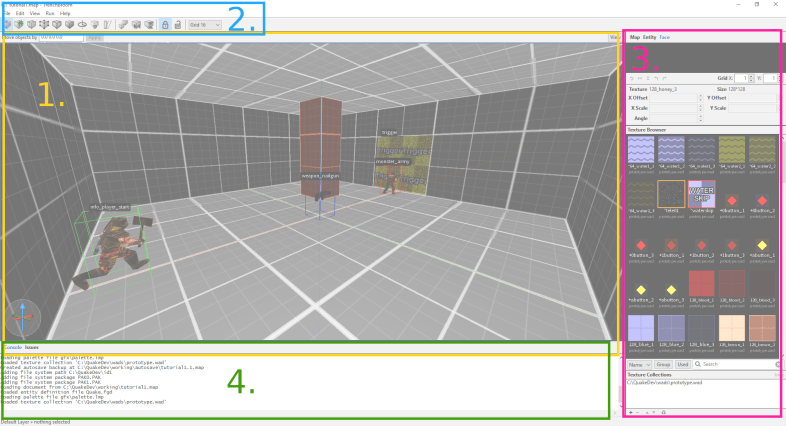
  1. The Viewport is the biggest part of the screen with a view into the map. By default, this view shows the map in perspective with textures and a grid.
  2. The Toolbar is at the top of the screen, with various tools for editing our map.
  3. The Inspector is on the right side of the screen with information about our selection in the level. At the top of the Inspector, there are tabs for “Map”, “Entity”, and “Face”. The Inspector is where we modify properties of our entities, or apply textures.
  4. Lastly, we have the Info Panel at the bottom of the screen, which informs us of errors and warnings in the level.

If your editor does not look like the picture above, then you can hide or show the Inspector and the Info Panel by selecting “View” in the toolbar, and selecting the relevant option. For now, we don’t need the Info Panel, but we will need the Inspector set to the “Face” tab for the next part of this tutorial.

tutorial_InspectorAndInfoPanel.gif

Adding the Texture Collection

If your view into the level shows a simple grey texture across the floors and walls, like this…

tutorial2_basicMap_00.PNG

… this means that the texture package, known as a “.wad” file, is not loaded. If you compile the map without textures, the result in game will be an unpleasant red-and-white checkerboard error texture on every surface. Instead, let’s load in a “.wad” file so our map has textures.

For this map, I used the “prototype.wad” by Khreathor. If you did not download the file in part 1 of this tutorial, you can download “prototype.wad” Here. Once downloaded, move the file to your “C:\QuakeDev\Wads” directory.

Now, with the Trenchbroom editor open, go to the Face tab of the Inspector. At the bottom, there is a section labeled “Texture Collections”, where we link our “.wad” files. Select the “+” button to add the “prototype.wad” in your “C:\QuakeDev\Wads” directory. Trenchbroom will then ask for the “Path Type” for your texture collection. Select “Absolute”, and you’re good to go!

tutorial_addingAWad.gif

Viewport Camera

Now that we have the level loaded with textures, let’s fly around!

With the Viewport in focus (left click within the viewport), the W, A, S, and D keys control the camera movement Forward, Left, Right, and Back, just like playing the game. These directions are relative to where the camera is facing, which you can change by moving the mouse while holding the right mouse button.

tutorial_CameraControls.gif

The Q and X keys move the camera up and down. Unlike WASD, the Up and Down movement are not based on where the camera is facing; Up and Down are always the same. (If you prefer a different arrangement of keys, you can go to “View” → “Preferences” and then select the Keyboard icon.)

What’s in the Map

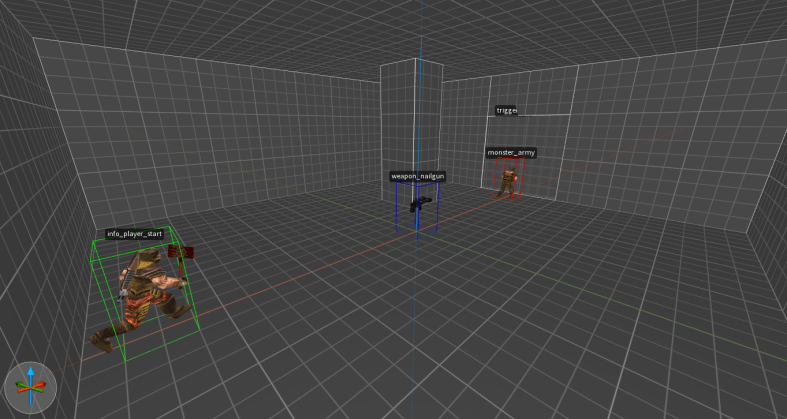
Now that we can fly around our level, let’s examine what’s here so far:

  • “Brushes” make up the floor, ceiling, and walls. The pillar with the orange texture is also a “brush”. These are solid blocks that define the level geometry we will see in game.
  • There is an “info_player_start”, which looks like a soldier running with an axe. This is where we will start in the map once we compile and play.
  • There is a “trigger_changelevel” with the “trigger” texture on the far side of the room. This works as our level exit.
  • There is a “monster_army” in front of the exit, to provide a simple obstacle for the player to overcome.
  • Last, there is a “weapon_nailgun” in the middle of the room, so the player has a tool to defeat the monster.

We’ll dig into these more in the next part of the tutorial. What matters for now is that we have the “info_player_start” and our “trigger_changelevel” so that we can play through the level from start to finish.

Compiling

At this point, we have our map, “tutorial1.map”, and we have the textures applied. We also have an idea of the pieces inside the map. Now let’s compile the map so we can play it!

First, let’s open the compiler GUI executable in “C:\QuakeDev\Tools\ne_q1spCompilingGui103”. Here we want to set our “Source Map”, which is on the right side of the program half way down, to “C:\QuakeDev\Working\tutorial1.map”. We should also check the “Pause After Compiling” box, which will keep the compiler window open and inform us of errors. With the “Source Map” set, we can now compile by selecting “File” → “Compile”.

tutorial_Compiling.gif

With our map compiled, look in your “C:\QuakeDev\id1\maps” folder for “tutorial1.bsp”. This is the compiled map.

tutorial2_compiledBSP.PNG

If you check your “C:\QuakeDev\Working” folder, you’ll now see some additional files. The original “tutorial1.map” file is still there for us to modify, and we also have a copy of the compiled “.bsp” and some “.log” files with information about the compiling process. What matters here is that we still have our “.map” file to modify.

tutorial2_working

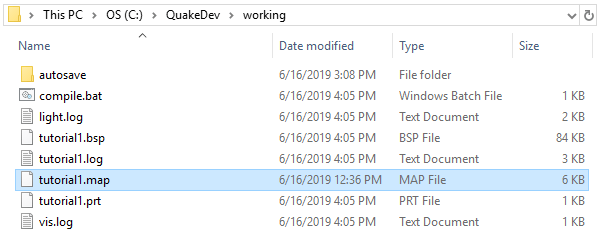
Our Working folder after compiling

Playing The Map

Now that we have a compiled version of our map, we can play it. One easy way to do this is directly from the compiling GUI by selecting “File” → “Run”.

tutorial_RunningFromCompiler.gif

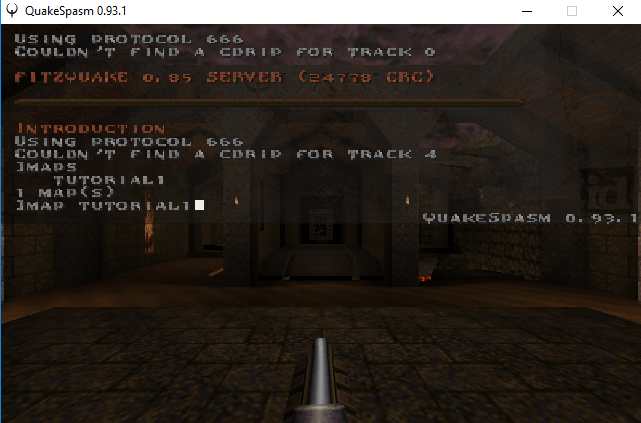
We can also run our map from within game. To do this, first open the Sourceport. Then start a new singleplayer game. Once in game, you can open the console with the tilde key, which lets you enter console commands and cheats. Here if you enter “maps”, you will see a list of all maps available to play, including “tutorial1”. To play this map, enter “map tutorial1”.

tutorial2_console.PNG

Next Time

In Part 3 of this tutorial, I’ll cover the basics of modifying the map so that you can make it your own. Then from there, we’ll take a leap from the basics of the tools to the more conceptual skills and design patterns of making a map for Quake.

In the meanwhile, here are some resources for you to continue learning:

  • Dumptruck_DS’s Trenchbroom Video Tutorials
  • The mapping tutorial on QuakeWiki.org
  • The Quake Mapping Discord for help and questions. (You can ping me @ mclogenog)
  • The Quake level repository Quaddicted
  • The Quake forum func_msgboard. This is where people post new releases and organize mapping events. (This branch of the community can be a little rigid in Quake orthodoxy, and also a bit of a boys club, so visit the forum with caution.)


Making Your First Map in Quake (Part 1)

For the rest of this series, see Preface and Part 2.

In this tutorial, I’ll walk through the basic setup for the tools to make your first Quake map. First, we’ll set up Quake to run with a modern sourceport. Then we’ll set up our level editor, Trenchbroom. Last, we’ll get our compiler running.

If you want to skip this tutorial and jump straight into the tools, you can download Jonathan Linat’s setup https://github.com/jonathanlinat/quake-leveldesign-starterkit. All you need to do is add an “id1” folder with your “pak0.pak” and “pak1.pak” files, which I explain below. Also note that Jonathan’s setup includes some tools we won’t be using in this tutorial, and there are some small differences in the file structure.

If you prefer a video explanation for setting up your tools, here is Dumptruck_DS’s quickstart tutorial covering the basics:  https://youtu.be/gONePWocbqA

The Folder Structure

To start, we need to create some folders. Go to a root directory of your computer, this could be your “C:” drive, or an “E:” or “F:” drive if you use external storage. In this root directory, create a folder named “QuakeDev”. This is where we will keep all of our tools and content.

Inside of “C:\QuakeDev”, create the following folders:

  •  “id1″—where we store the original Quake content and our completed maps.
  • “tools”—where we store our editor and compiler
  • “working”—where we store our rough drafts “.map” files.
  • “wads”—where we store our texture packages, called “.wad” files.

Your folder structure should now look like this:

tutorial_folderStructure_01.PNG

Quake Game Assets

Now that we have our folder structure, we need to fill it. And the first thing we need is the Quake content so we can play the game.

If you don’t have a copy of Quake already, you can purchase it for a few dollars on steam or gog (where it also includes the expansion packs).

Once you have downloaded a copy of the game, you will need to find the files “pak0.pak” and “pak1.pak” within the “id1” folder. These “pak” files contain all of the game’s content, including the models, textures, sounds, maps, and even the compiled gameplay code! Copy these files, and paste them in your “C:\QuakeDev\id1” folder.

id1_localFiles_01

How to find your id1 pak files from a steam download

While in your “C:\QuakeDev\id1” folder, you should also add a  “maps” folder. This is where our final levels will go so we can play them.

The Sourceport

If you have played your copy of Quake through steam or gog, you may have run into problems with the graphics on your modern computer. This is where sourceports come in. A sourceport is a modern version of the engine (a port of the source code) to run the gameplay code with more features and better compatibility.

For a simple sourceport, I recommend Quakespasm, which you can download here:  https://sourceforge.net/projects/quakespasm/. For additional information about Quakespasm, you can visit their website.

I will be using Quakespasm throughout this tutorial, but you may also be interested in trying the Mark V sourceport http://quakeone.com/markv/.

Once you have downloaded your sourceport, you should extract the files into your “C:\QuakeDev” directory.

With the sourceport extracted, your “C:\QuakeDev” directory should now look like this:

tutorial_folderStructure_02.PNG

It’s important that your sourceport executable (“Quakespasm.exe” in this case) is in this folder above the id1 folder, because quakespasm needs the id1 “.pak” files to run.

If you extracted your sourceport into a subfolder, like “C:\QuakeDev\Quakespasm-0.93.1_Win64”, then the sourceport won’t work without additional configuration. You should cut and paste those files to the “C:\QuakeDev” directory.

Testing So Far

Now that you have the game and your sourceport, you should test that everything works. Run “Quakespasm.exe” and attempt to start a new singleplayer game. If everything is correct, you should see something like this:

sourceport_success.png

If instead you see a warning like this…sourceport_error.PNG

… double check that “Quakespasm.exe” and the id1 folder are in the QuakeDev folder, and that “pak0.pak” and “pak1.pak” are directly within the id1 folder.

At this point, you can now play all of the base game for Quake. As you go through this tutorial series, I recommend taking the time to play the first episode of Quake. This will help you develop your tastes as a designer and gain a sense of what works and what doesn’t, especially from a perspective of 2019 looking back at a 23 year old game.

The Level Editor

Now that we can play Quake, let’s set up the tools to make maps.  First, we need a level editor, which let’s us create and modify our “.map” files; this means everything from shaping level geometry to adding monsters and applying textures.

For our level editor, we will be using Trenchbroom, which you can download here: https://github.com/kduske/TrenchBroom/releases/download/v2019.6/TrenchBroom-Win32-v2019.6-Release.7z. You can also read more about the tools on the main Trenchbroom website.

Once you have downloaded trenchbroom, extract it into your “C:\QuakeDev\Tools” directory. You may also need 7-zip to extract the Trenchbroom files. (7-zip is a tool that allows for better zipped file compression than standard “.zip” files.)

For Trenchbroom and our other tools, the exact directory location does not matter. We could have our Trenchbroom folder in “My Documents” and still be able to work. But it’s good to keep organized with all of your tools in one spot, especially if you have multiple versions of the tools.

Once you have your Trenchbroom files extracted, I recommend creating a shortcut to the “Trenchbroom.exe” in your main “C:\QuakeDev” directory. This will save you time digging through folders, and make life easier for enabling mods later on.

trenchbroom_shortcut.gif

The Trenchbroom file structure and shortcut

Configuring Trenchbroom

Now let’s run Trenchbroom for the first time and make sure it works. First, let’s set our preferences for making Quake maps in Trenchbroom. When you create a new map, there is an option to Open Preferences. Here, you should go to the Quake tab and set the Game Path to “C:\QuakeDev” where your sourceport is.

trenchbroom_preferences.gif

These preferences are also where you can modify your keyboard, mouse, and display settings for Trenchbroom. For this tutorial series, we will be using the defaults.

Now that the preferences are set, let’s create a new map and select Quake for the game. If everything is working, you should see a screen like this:

trenchbroom_start.PNG

I will go into detail on the features of the Trenchbroom editor in a future tutorial. For now, what matters is that it works!

If you saw an error message, or your editor did not launch successfully, you may need these Visual C++ Redistributables.

The Compiler

Quake level design involves two main types of file. There are the “.map” files, which are what we use in our level editor. Then there are the “.bsp” files, which are the compiled maps that we can play. In order to turn the raw “.map” file into a “.bsp”, we have to compile it. This compilation process optimizes the map, creating “view portals” that determine what is visible to the player in the final map. The compilation process also calculates the lighting in our level by “baking” the light data as “lightmaps”, sort of like texture.

You can think of compiling like baking a cake. The “.map” file is the cake batter and the “.bsp” is the cake. While we’re working with the batter, we can still make changes. Once the batter goes into the oven and “compiles”, those changes are locked in. Our compiler tools make our lives a little easier than with baking because we get to keep a copy of the “.map” when it creates the “.bsp” result, instead of having to start a new cake.

For our compiler, we will use EricW’s Tools, which you can download here: https://github.com/ericwa/ericw-tools/releases/download/v0.18.2-rc1/ericw-tools-v0.18.1-32-g6660c5f-win32.zip. You can also read more about EricW’s tools on his website. As a modern compiler, we get many more options than were possible with Quake back in 1996, like sunlight and bounce lighting!

Once you download EricW’s compiler, extract it to “C:\QuakeDev\Tools”. Your folder should now look like this:

compiler_folder_01.PNG

Inside of the ericw-tools folder, you should then have a “bin” folder and a “doc” folder. The “bin” folder contains the “binaries” which are the executables that run the various stages of “.map” compilation.

You now have everything you need to make and compile a map! But, let’s make our lives a little easier with a graphical user interface for our compiler. For this, we will be using the Necros Compiler GUI, which you can download here: http://www.quaddicted.com/files/tools/ne_q1spCompilingGui103.zip. You can also read more about the compiling GUI on the tool’s website, The Shores of Nis.

Once you download the compiler GUI, extract it to “C:\QuakeDev\Tools”. Your folder should now look like this:

compiler_folder_02.PNG

Now we need to set up our compiler GUI to know about the actual compiler tools. Go to “C:\QuakeDev\Tools\ne_q1spCompilingGui103” and run “ne_q1spCompilingGui103.exe”. From here, let’s go to “settings” and then “folder setup”. On this screen, we need to make three changes:

  1. Set the “Tools Folder” (in the top left) to the “bin” folder containing the EricW compiler tools.
  2. Set the “Working Folder” (in the middle right) to the “C:\QuakeDev\Working” folder we created earlier. This is where the compiler will save a copy of our “.map” and output warning logs for errors.
  3. Set the “Output Folder” to “C:\QuakeDev\id1\maps”. If you did not create this “maps” folder earlier, do so now. This is where our compiled “.bsp” will go so we can play them.

Once you have completed these steps, your compiler settings should look like this:

compiler_settings.PNG

Now select “Done”, which returns you to the main screen of the compiler GUI. Here, we need to set the “Quake Engine” to our sourceport. Once we have a map to compile, we will also want to change the “Source Map”.

compiler_settings_02.PNG

As with Trenchbroom, I recommend creating a shortcut to the “C:\QuakeDev\Tools\ne_q1spCompilingGUI\ne_q1spCompilingGUI.exe” that you can access from the main “C:\QuakeDev” directory.

One Last Thing

All you are missing now to make your own first Quake map are some textures. To keep things simple to start, I recommend downloading id1_wads_per_map, which includes a “.wad” texture package for each level in the original game. I also recommend Khreathor’s prototype.wad, which has simple grid textures and a variety of colors.

Extract your “.wad” texture packages into the “C:\QuakeDev\Wads” directory to keep things organized.

Next Time

For Part 2 of this tutorial series, I explain how to use these tools that we’ve set up. I also explain how to take a basic map through the compilation process. In Part 3, we’ll start modifying our first map and learning some features of the tools. From there, we’ll explore the design patterns of Quake.

In the meanwhile, here are some resources for you to continue learning: